
배경
웹뷰를 사용하여 앱을 구성하고 있다.
웹뷰는 마치 HTML의 iframe 태그처럼, 내부적으로 하나의 화면을 띄우는 형태이다.
그런데 우리 서비스의 로그인 로직은 앱에 있어서, 웹에서 따로 로그인/로그아웃을 구현하지 않고, 앱 내부의 JWT토큰을 웹으로 전달할 수 있어야 했다. 또한 웹내에서 JWT토큰이 만료되는 경우 로그인 페이지로 이동시켜줄 필요가 있었다.
우선 Web과 App환경의 통신 방법에 대해 알아보고, 이후에 토큰을 내부적으로 관리해볼 것이다.
기본 구성하기
기본적으로 react-native-webview 라이브러리를 사용해서 WebView 화면을 띄워주었다.
https://www.npmjs.com/package/react-native-webview
react-native-webview
React Native WebView component for iOS, Android, macOS, and Windows. Latest version: 13.6.4, last published: 24 days ago. Start using react-native-webview in your project by running `npm i react-native-webview`. There are 950 other projects in the npm regi
www.npmjs.com
해당 라이브러리는 웹뷰 컴포넌트를 지원한다.
요런식으로 uri만 집어넣으면 해당 웹 사이트를 앱 내부에서 브라우저로 띄워주는 것이다.
import React, { Component } from 'react';
import { StyleSheet, Text, View } from 'react-native';
import { WebView } from 'react-native-webview';

// ...
const MyWebComponent = () => {
  return <WebView source={{ uri: 'https://reactnative.dev/' }} style={{ flex: 1 }} />;
}
이벤트 핸들러 알아보기
react-native-webview에서 제공하는 WebView컴포넌트는 다양한 이벤트 핸들러를 제공한다.
그중 onLoad와 onMessage를 사용해서 웹 화면과 앱이 통신하게 만들 것이다.
onLoad는 웹뷰 화면이 불러와졌을때를, onMessage는 웹으로 부터 메시지를 받은 경우, 콜백함수를 수행시킨다.
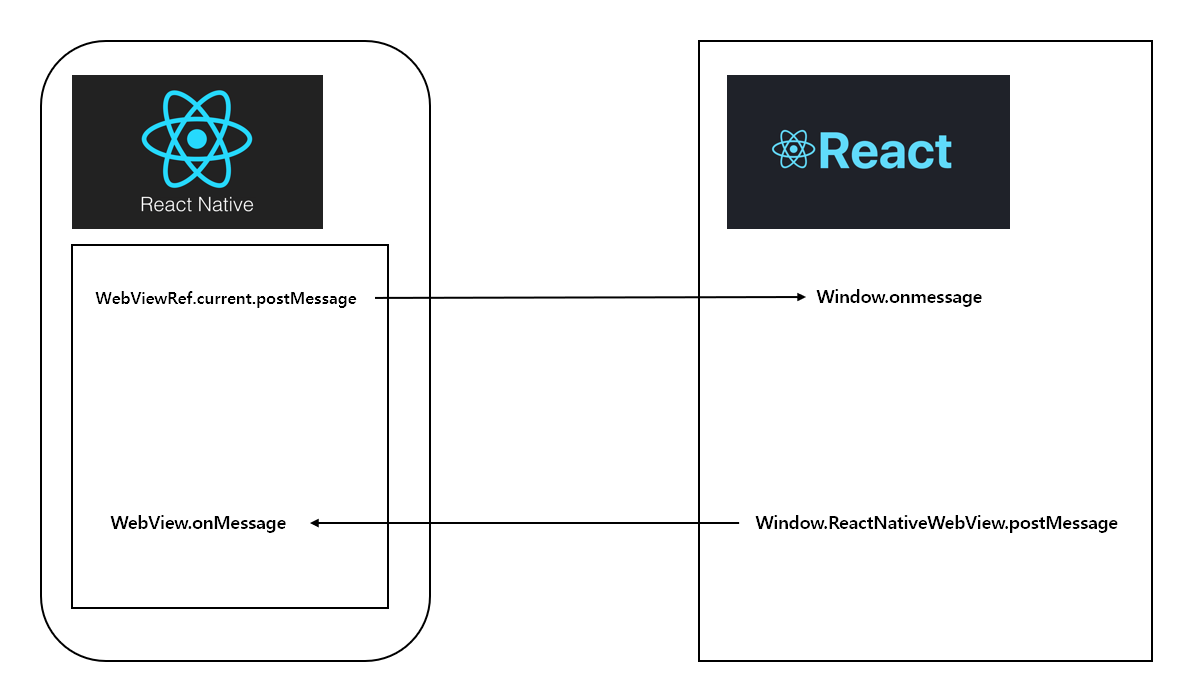
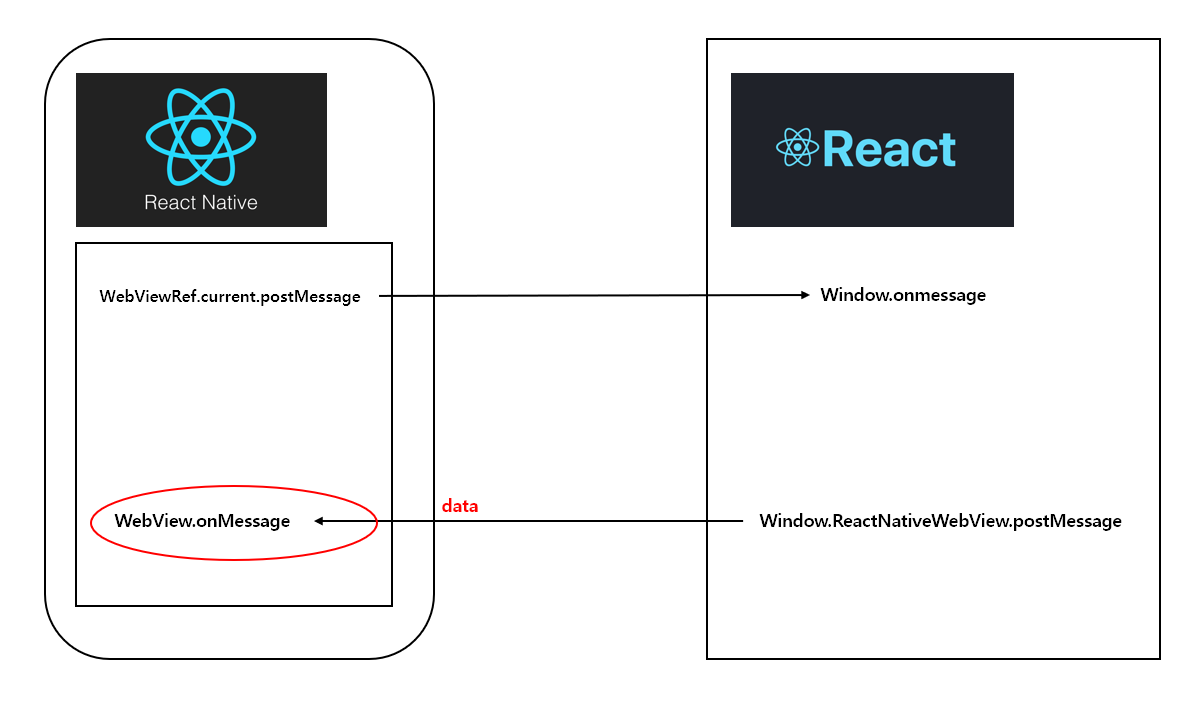
postMessage
웹뷰와 웹 모두 postMessage라는 메서드를 통해 통신한다.
웹의 경우에는 window.ReactNativeWebView.postMessage 를 통해, 앱에서는
WebView컴포넌트.postMessage형태로 사용한다. (ref를 활용해야한다.)
다만, 이 두가지 상에서 오고갈 수 있는 것은 string데이터여서 객체를 보내기 위해서는 JSON.stringify를 통해 string으로 변환하여 넘겨야하고, 받을때는 JSON.parse를 통해 객체로 변환해주어야한다.
양방향 통신 간단하게 살펴보기
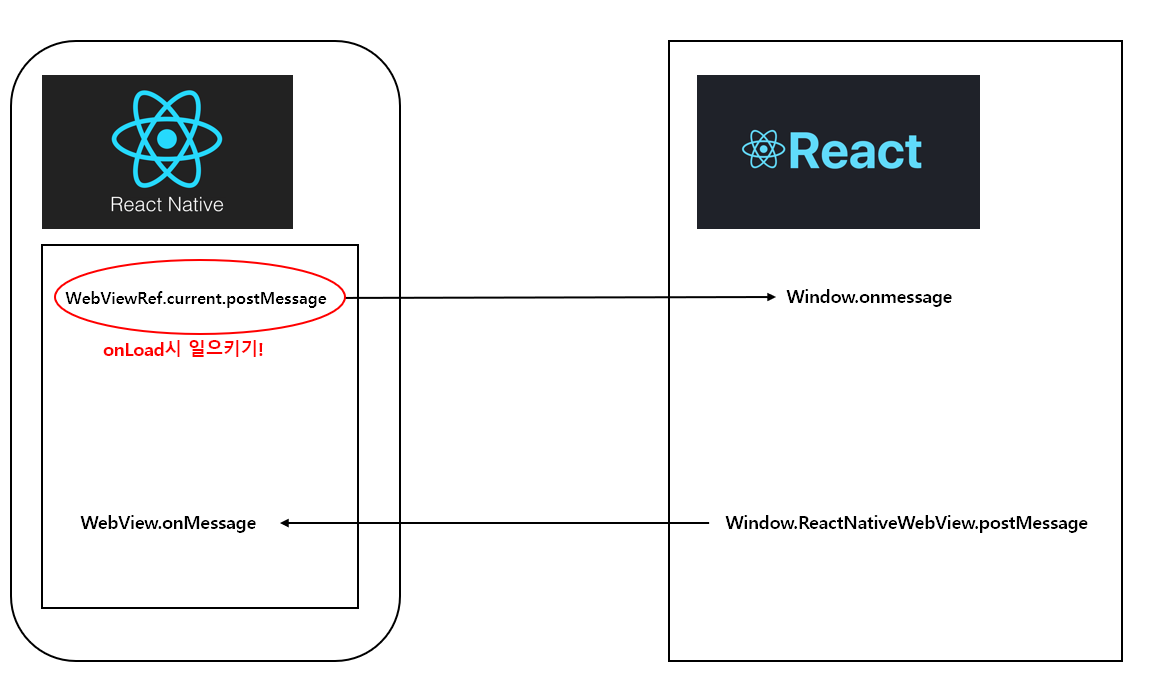
앱 (RN) -> 웹 (React)
앱에서 토큰 넘겨주기
그럼 이제 onLoad됐을때 WebViewRef.current.postMessage를 통해 웹화면으로 token을 넘겨주면된다.
export default function CustomWebView({uri}: {uri: string}) {
  const webViewRef = useRef<WebView>(null);
  const onLoad = async () => {
    const accessToken = await storageGetValue('accessToken'));
    const refreshToken = await storageGetValue('refreshToken');
    if (webViewRef.current) {
      webViewRef.current.postMessage(
        JSON.stringify({accessToken, refreshToken}),
      );
    }
  };

  ...
  return <WebView
        uri={{uri}}
        ref={webViewRef as any}
        onLoad={onLoad}
      />
  }
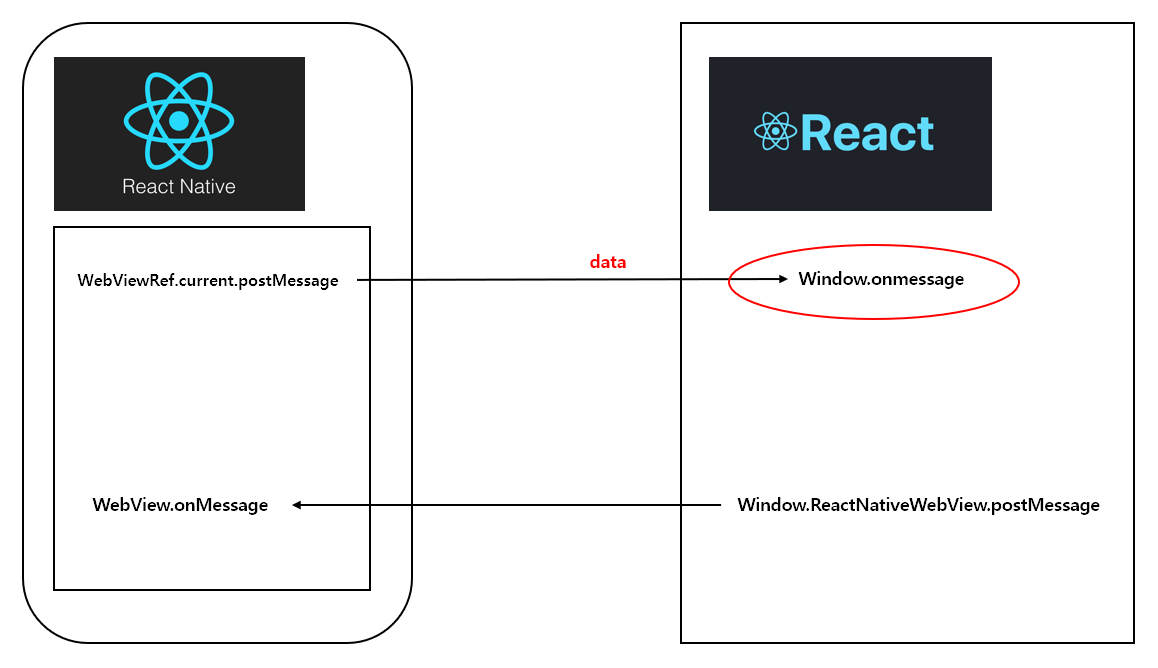
웹에서 토큰 받기
App.tsx 최상단에서 window의 onmessage 이벤트에 대한 콜백함수를 등록해주자.
onmessage이벤트는 여기를 참고하면 좋다. (이렇게 등록하는 것으로 보아 WebViewRef.currentMessage.postMessage는 Window.postMessage를 활용한다는 것을 유추해 볼 수 있다.)
//App.tsx
  const tokenHandler = (event: MessageEvent) => {
    const { accessToken, refreshToken } = JSON.parse(event.data);
    console.log(accessToken, refreshToken);
  };

  useEffect(() => {
    //안드로이드와 iOS의 차이때문에 두개를 달아준다.
    document.addEventListener('message', tokenHandler as EventListener);
    window.addEventListener('message', tokenHandler);
  }, []);
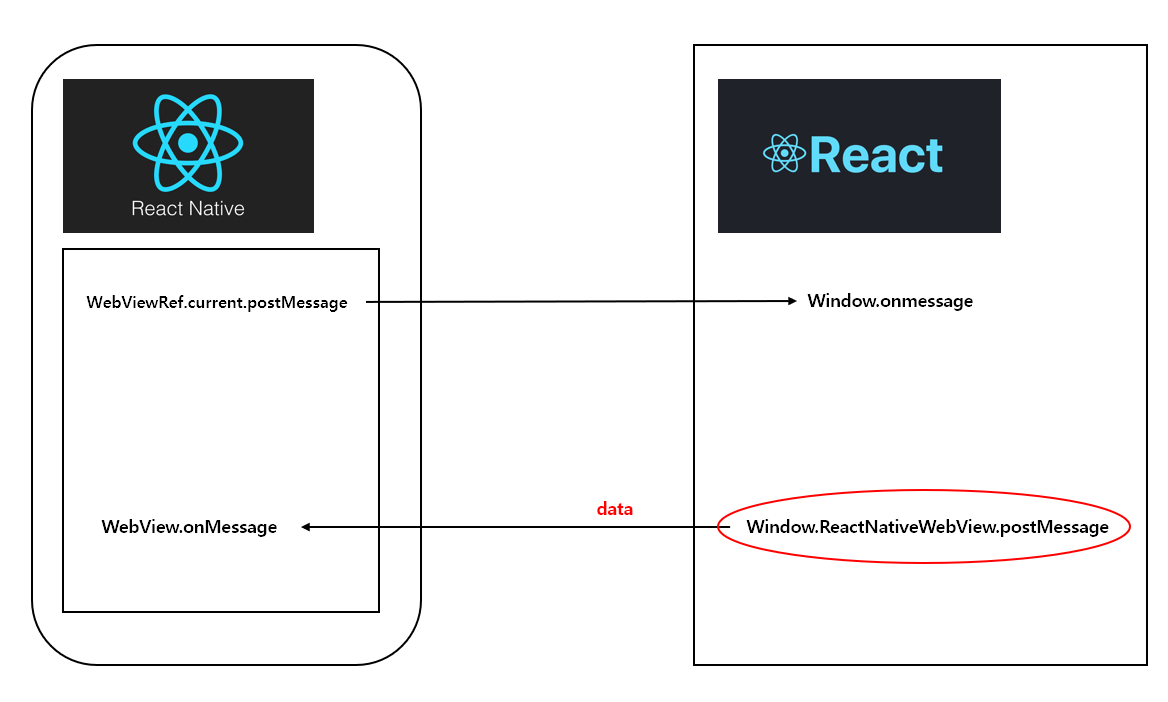
웹(React) -> 앱(RN)
웹에서 앱으로 일으키는 이벤트는 window.ReactNativeWebView.postMessage메서드를 통해서 발생시킬 수 있고, 앱에서는 WebView컴포넌트의 onMessage props를 통해 콜백을 등록할 수 있다.
웹에서 이벤트 일으키기
window.ReactNativeWebView.postMessage를 통해 일으킨다.
ts를 사용중인 경우 global declare를 통해 타입을 추가해주자.
나같은 경우에는 vite를 사용하기에 vite-env.d.ts에 Window interface를 추가하여 타입문제를 해결했다.
/// <reference types="vite/client" />
interface Window {
  ReactNativeWebView: {
    postMessage: (value: string) => void;
  };
}
예시로 type이 Back인 객체를 전송해보겠다.
export default function MyPageHeader({ children }: { children: string }) {
  const back = () => window.ReactNativeWebView.postMessage(JSON.stringify({ type: 'BACK' }));
  return <Header onClick={back}>{children}</Header>;
}헤더에서 뒤로가기를 누르면 앱에서 뒤로가기를 하게 만들 것이다.
앱에서 이벤트 받기
앱에서는 onMessage 핸들러를 추가해서 이벤트 data를 받아올 수 있다.
  const onMessage = async (event: WebViewMessageEvent) => {
    const {nativeEvent} = event;
    const {type} = JSON.parse(nativeEvent.data); //받은 string을 객체로 변환하고, type을 가져옴

    if (type === 'BACK') navigation.goBack();
    if (type === 'LOGOUT') logoutApi();
  };
위의 코드들을 통해서 웹뷰와 웹 환경의 양방향 통신을 방법에 대해 알아보았다.
다음 게시글에서는 여기서 받은 JWT를 통해 어떻게 웹에서 토큰을 관리했는지 작성해볼 것이다.
배경
웹뷰를 사용하여 앱을 구성하고 있다.
웹뷰는 마치 HTML의 iframe 태그처럼, 내부적으로 하나의 화면을 띄우는 형태이다.
그런데 우리 서비스의 로그인 로직은 앱에 있어서, 웹에서 따로 로그인/로그아웃을 구현하지 않고, 앱 내부의 JWT토큰을 웹으로 전달할 수 있어야 했다. 또한 웹내에서 JWT토큰이 만료되는 경우 로그인 페이지로 이동시켜줄 필요가 있었다.
우선 Web과 App환경의 통신 방법에 대해 알아보고, 이후에 토큰을 내부적으로 관리해볼 것이다.
기본 구성하기
기본적으로 react-native-webview 라이브러리를 사용해서 WebView 화면을 띄워주었다.
https://www.npmjs.com/package/react-native-webview
react-native-webview
React Native WebView component for iOS, Android, macOS, and Windows. Latest version: 13.6.4, last published: 24 days ago. Start using react-native-webview in your project by running `npm i react-native-webview`. There are 950 other projects in the npm regi
www.npmjs.com
해당 라이브러리는 웹뷰 컴포넌트를 지원한다.
요런식으로 uri만 집어넣으면 해당 웹 사이트를 앱 내부에서 브라우저로 띄워주는 것이다.
import React, { Component } from 'react';
import { StyleSheet, Text, View } from 'react-native';
import { WebView } from 'react-native-webview';

// ...
const MyWebComponent = () => {
  return <WebView source={{ uri: 'https://reactnative.dev/' }} style={{ flex: 1 }} />;
}
이벤트 핸들러 알아보기
react-native-webview에서 제공하는 WebView컴포넌트는 다양한 이벤트 핸들러를 제공한다.
그중 onLoad와 onMessage를 사용해서 웹 화면과 앱이 통신하게 만들 것이다.
onLoad는 웹뷰 화면이 불러와졌을때를, onMessage는 웹으로 부터 메시지를 받은 경우, 콜백함수를 수행시킨다.
postMessage
웹뷰와 웹 모두 postMessage라는 메서드를 통해 통신한다.
웹의 경우에는 window.ReactNativeWebView.postMessage 를 통해, 앱에서는
WebView컴포넌트.postMessage형태로 사용한다. (ref를 활용해야한다.)
다만, 이 두가지 상에서 오고갈 수 있는 것은 string데이터여서 객체를 보내기 위해서는 JSON.stringify를 통해 string으로 변환하여 넘겨야하고, 받을때는 JSON.parse를 통해 객체로 변환해주어야한다.
양방향 통신 간단하게 살펴보기
앱 (RN) -> 웹 (React)
앱에서 토큰 넘겨주기
그럼 이제 onLoad됐을때 WebViewRef.current.postMessage를 통해 웹화면으로 token을 넘겨주면된다.
export default function CustomWebView({uri}: {uri: string}) {
  const webViewRef = useRef<WebView>(null);
  const onLoad = async () => {
    const accessToken = await storageGetValue('accessToken'));
    const refreshToken = await storageGetValue('refreshToken');
    if (webViewRef.current) {
      webViewRef.current.postMessage(
        JSON.stringify({accessToken, refreshToken}),
      );
    }
  };

  ...
  return <WebView
        uri={{uri}}
        ref={webViewRef as any}
        onLoad={onLoad}
      />
  }
웹에서 토큰 받기
App.tsx 최상단에서 window의 onmessage 이벤트에 대한 콜백함수를 등록해주자.
onmessage이벤트는 여기를 참고하면 좋다. (이렇게 등록하는 것으로 보아 WebViewRef.currentMessage.postMessage는 Window.postMessage를 활용한다는 것을 유추해 볼 수 있다.)
//App.tsx
  const tokenHandler = (event: MessageEvent) => {
    const { accessToken, refreshToken } = JSON.parse(event.data);
    console.log(accessToken, refreshToken);
  };

  useEffect(() => {
    //안드로이드와 iOS의 차이때문에 두개를 달아준다.
    document.addEventListener('message', tokenHandler as EventListener);
    window.addEventListener('message', tokenHandler);
  }, []);
웹(React) -> 앱(RN)
웹에서 앱으로 일으키는 이벤트는 window.ReactNativeWebView.postMessage메서드를 통해서 발생시킬 수 있고, 앱에서는 WebView컴포넌트의 onMessage props를 통해 콜백을 등록할 수 있다.
웹에서 이벤트 일으키기
window.ReactNativeWebView.postMessage를 통해 일으킨다.
ts를 사용중인 경우 global declare를 통해 타입을 추가해주자.
나같은 경우에는 vite를 사용하기에 vite-env.d.ts에 Window interface를 추가하여 타입문제를 해결했다.
/// <reference types="vite/client" />
interface Window {
  ReactNativeWebView: {
    postMessage: (value: string) => void;
  };
}
예시로 type이 Back인 객체를 전송해보겠다.
export default function MyPageHeader({ children }: { children: string }) {
  const back = () => window.ReactNativeWebView.postMessage(JSON.stringify({ type: 'BACK' }));
  return <Header onClick={back}>{children}</Header>;
}
헤더에서 뒤로가기를 누르면 앱에서 뒤로가기를 하게 만들 것이다.
앱에서 이벤트 받기
앱에서는 onMessage 핸들러를 추가해서 이벤트 data를 받아올 수 있다.
  const onMessage = async (event: WebViewMessageEvent) => {
    const {nativeEvent} = event;
    const {type} = JSON.parse(nativeEvent.data); //받은 string을 객체로 변환하고, type을 가져옴

    if (type === 'BACK') navigation.goBack();
    if (type === 'LOGOUT') logoutApi();
  };
위의 코드들을 통해서 웹뷰와 웹 환경의 양방향 통신을 방법에 대해 알아보았다.
다음 게시글에서는 여기서 받은 JWT를 통해 어떻게 웹에서 토큰을 관리했는지 작성해볼 것이다.