왜 도입하게 되었나
블로그 피드를 만들긴 했으나, 블로그 글이 올라왔을때, 알림이 오게 하고 싶었다.
풀과 푸시
풀

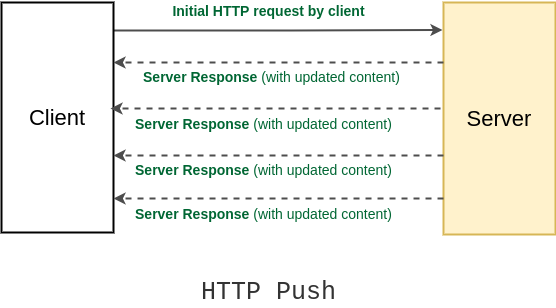
일반적으로 사용되는 HTTP요청의 모습이다 request가 오면 서버가 response를 주는 형태이다.
푸시

푸시는 요청이 없어도 응답을 내려준다.
fcm에서는 서비스워커(firebase-messaging-sw.js)가 일을 한다고 한다.
FCM이란?
Firebase Cloud Messaging의 약자이다.

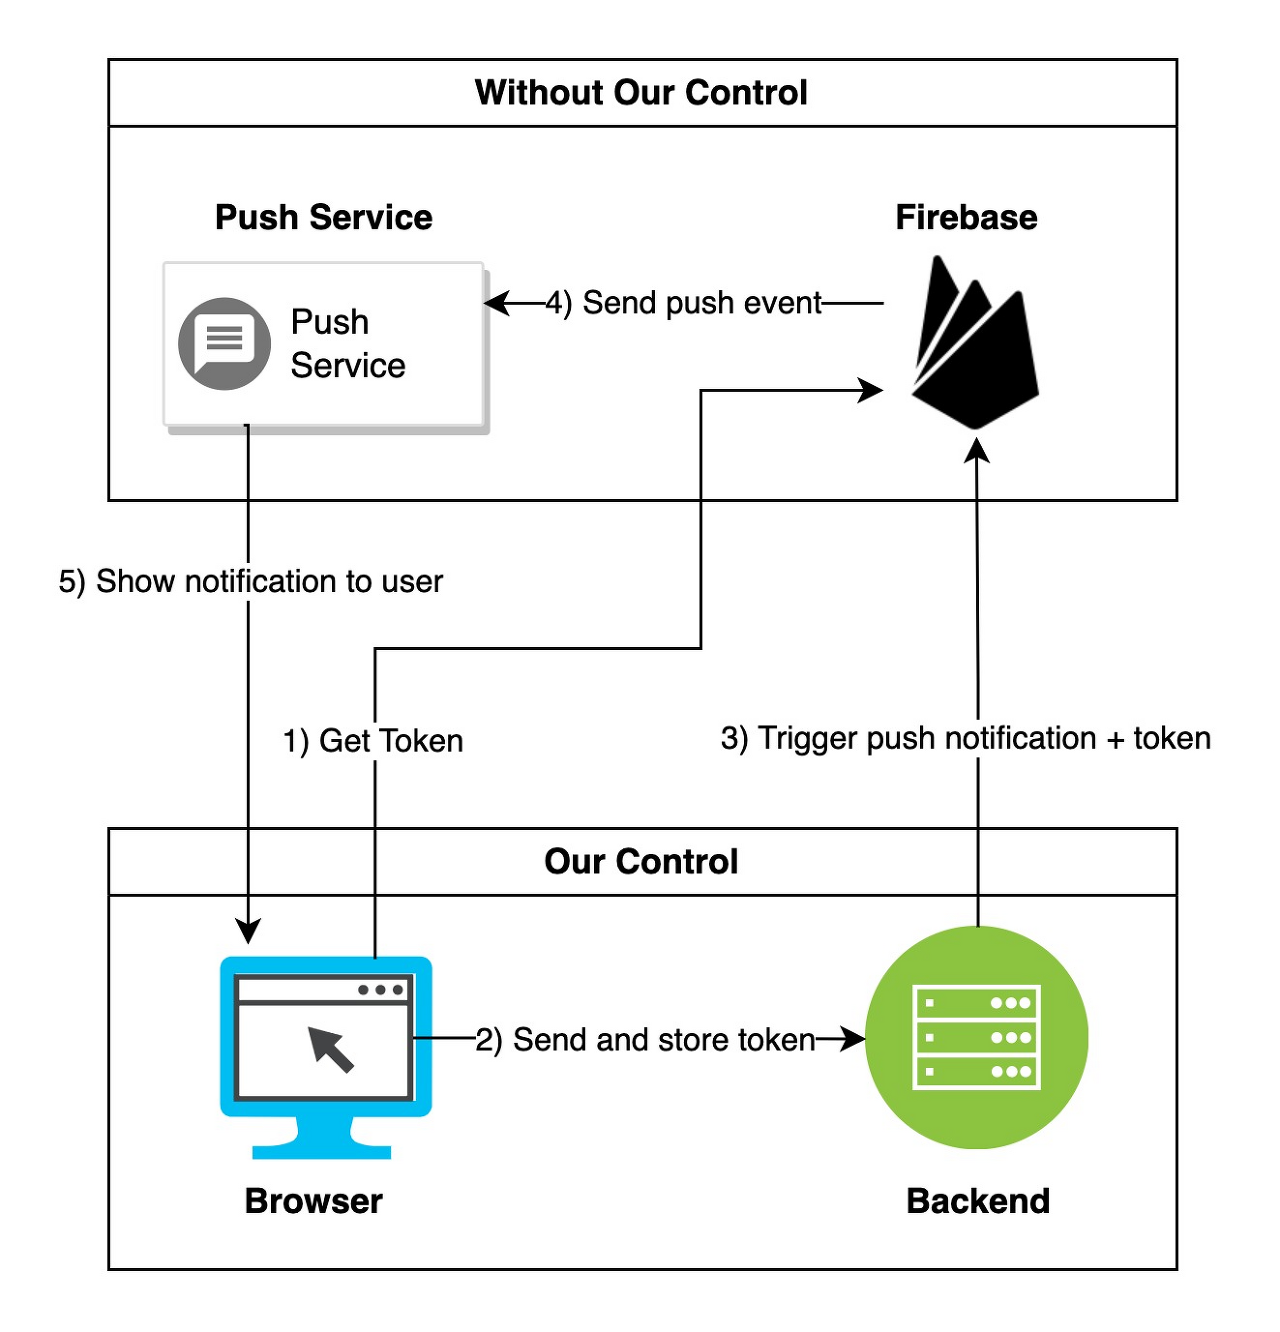
위 사진처럼 동작한다. 위사진 과정을 이해해보자.
준비과정
1. Get Token
클라이언트는 디바이스 고유의 token을 firebase로부터 발급받는다.
이 token은 기기마다 고유하다!
2. Send and store token
1번에서 발급받은 클라이언트 고유의 토큰을 서버로 전송하고, 서버는 db에 토큰을 저장한다.
푸시알림을 보내기
3. Trigger push notification + token
특정 조건에 맞을때, 서버가 firebase에 push notification정보와 푸시알림을 발생시킬 디바이스 정보인 토큰을 넘겨준다.
4. Send push event
firebase가 push service에 push 이벤트를 보낸다.
푸시알림을 보여주기
5. Show notification to user
Push Service가 클라이언트 디바이스에게 푸시알림을 보여준다.
기본적인 구성은 아래의 블로그들을 따랐다.
기본 설정은 두번째, 코드 구성은 첫번째 구성을 따랐다.
[next.js, fcm] 웹 푸시 구현하기
파이어베이스로 웹 푸시를 구현해보자
velog.io
폴시랩
자바스트립트, PHP, 워드프레스, HTML, CSS, 팁, 가이드, 일상이야기.
falsy.me
구현

자 위 그림을 하나씩 구현해보자.
1. Get Token
클라이언트가 접속했을시에 firebase에 token을 얻어올 수 있게 구성해야한다.
_app.tsx에 useEffect를 활용해서 딱 한번만 접속시에 토큰을 받아올 수 있게 하자.
import { getMessaging, getToken, onMessage } from 'firebase/messaging';
// Import the functions you need from the SDKs you need
export const getFireBaseToken = async () => {
  try {
    const messaging = getMessaging();
    const token = await getToken(messaging, {
      vapidKey: process.env.NEXT_PUBLIC_VAPID_KEY,
    });
    onMessage(messaging, (payload) => {
      console.log('Message recieved. ', payload);
    });
    return token;
  } catch (err: any) {
    throw err;
  }
};
_app.tsx
const firebaseConfig = {
  apiKey: ' ',
  authDomain: ' ',
  projectId: ' ',
  storageBucket: ' ',
  messagingSenderId: ' ',
  appId: ' ',
  measurementId: ' ',
};

...
  useEffect(() => {
    try {
      const app = initializeApp(firebaseConfig);
      getFireBaseToken();
    } catch (err) {
      console.log(err);
    }
  }, []);
2. Send and store Token
백엔드 서버로 날려주는 과정이 필요하다.
useEffect를 아래와 같이 바꿔주었다.
  useEffect(() => {
    try {
      const app = initializeApp(firebaseConfig);
      fireBaseMessageToken();
    } catch (err) {
      console.log(err);
    }
  }, []);
  const fireBaseMessageToken = async () => {
  	//위에서 작성한 getFireBaseToken()을 여기로 옮겼다.
    const fcmtoken = await getFireBaseToken();
    const tokens = await axios.get(`${window.location.href}api/token`);
    //미리 구성된 백엔드 서버에서 토큰 목록을받아온다.
    if (tokens) {
      const result = tokens.data.find(
        ({ token }: { token: string }) => token === fcmtoken
      );
      //디바이스 토큰이 백엔드 서버에 등록되지 않았다면
      if (!result) {
      // 백엔드 서버에 디바이스 토큰을 더한다.
        await axios.post(`${window.location.href}api/token`, {
          token: fcmtoken,
        });
      }
    }
    console.log('결과 : ', tokens);
};백엔드 서버 엔티티 구성
Express + TypeORM을 써서 엔티티를 이렇게 구성했다.
백엔드 서버의 mysql DB에 테이블을 만들고, 거기에 디바이스 토큰을 저장한다.
여기서 부터 백엔드 코드다.
import { Entity, PrimaryGeneratedColumn, Column } from 'typeorm';

@Entity()
export class FCMToken {
  @PrimaryGeneratedColumn()
  id: number;
  @Column()
  token: string;
}export class FCMTokenDAO {
static Repo = AppDataSource.getRepository(FCMToken);
static async addToken(token: string) {
const newToken = new FCMToken();
newToken.token = token;
return await FCMTokenDAO.Repo.save(newToken);
}
static async getAllToken() {
return await FCMTokenDAO.Repo.find();
}
static async deleteToken(token: string) {
return await FCMTokenDAO.Repo.delete({ token: token });
}
}3. Trigger push notification + token
자 토큰을 모아뒀으니 이제 알림을 전송헤보자.
DB에 피드를 저장해두고, 기존 피드에 없던 피드가 추가되면 알림을 보낸다.
우선 알림을 쏘는 코드를 작성해주자.
import { ServiceAccount } from 'firebase-admin';
import admin from 'firebase-admin';
import dotenv from 'dotenv';
import { FCMTokenDAO } from '../DAO/FCMTokenDAO';
interface NotificationData {
  data: {
    title: string;
    body: string;
    image: string;
    click_action: string;
  };
}

export const sendFCMNotification = async (data: NotificationData) => {
  dotenv.config();
  // Firebase Admin SDK 초기화
  const serviceAccount: ServiceAccount = {
    // 얘는 기존 파이어베이스 api 키
    projectId: process.env.PROJECT_ID,
    // 얘네는 새로 구해온 서비스 계정 비공개 키
    privateKey: process.env.FIREBASE_PRIVATE_KEY.replace(/\\n/g, '\n'),
    clientEmail: process.env.FIREBASE_CLIENT_EMAIL,
  };
  if (!admin.apps.length) {
    admin.initializeApp({
      credential: admin.credential.cert(serviceAccount),
    });
  }

  // 토큰 불러오기
  // 앞서 푸시 권한과 함께 발급받아 저장해둔 토큰들을 모조리 불러온다.
  // 본인에게 익숙한 방법으로 저장하고 불러오면 된다.
  // 내 경우 firestore에 저장하고 불러오도록 했다.
  const tokens = await FCMTokenDAO.Repo.find();
  let tokenList: Array<string> = tokens.map((token) => token.token);
  if (tokenList.length === 0) return;

  // 푸시 데이터
  // api 호출할 때 받아올 데이터와 방금 불러온 토큰
  const notificationData = {
    ...data,
    tokens: tokenList,
  };
  console.log(notificationData);

  // 푸시 발송
  // sendMulticast()는 여러개의 토큰으로 푸시를 전송한다.
  // 외에도 단일 토큰에 발송하는 등의 다양한 메소드 존재
  const res = await admin.messaging().sendEachForMulticast(notificationData);

  return res;
};그러면 이제 새글을 감지해서 푸시알림을 전송하자.
import Parser from 'rss-parser';
import { AppDataSource } from '../data-source';
import { Feed } from '../entity/Feed';
import { JSDOM } from 'jsdom';
import { sendFCMNotification } from './sendFCM';

export interface feed {
  writer: string;
  title: string;
  link: string;
  content: string;
  thumbnail: string;
  date: string;
}

interface blogData {
  name: string;
  blog: string;
}
export class FeedService {
  static FeedDAO = AppDataSource.getRepository(Feed);

  static async post(blogList: blogData[]) {
    const result = await getRss(blogList); // 최신 블로그 데이터를 rss를 파싱해서 만듦
    const defaultRss = await FeedService.FeedDAO.find(); //기존 데이터를 전부 꺼내옴
    const newItems = getNewItems(defaultRss as unknown as feed[], result); //새로운 아이템 얻어오기
    if (newItems.length) { //새로운 글이 있는 경우
      const notification = { //푸시알림 객체 생성
        data: {
          title: '새로운 글이 작성되었어요!',
          body: `${newItems[0].writer}${
            newItems.length - 1
              ? `외${newItems.length - 1}명이 글을 작성했으니 읽어보삼요`
              : `의 글을 읽어보삼요`
          }`,
          image: 'https://blog.cau-likelion.org/icons/icon-192x192.png',
        },
      };

      const fcm = await sendFCMNotification(notification); //미리 만들어둔푸시알림 전송함수

      await FeedService.FeedDAO.clear(); //DB데이터 비움(너무 글이 많아지면 EC2에 문제가 생길 수 있어서 이렇게 처리)
      const feeds = result.map((posting) => {
        const feed = new Feed();
        feed.content = posting.content;
        feed.date = posting.date;
        feed.link = posting.link;
        feed.thumbnail = posting.thumbnail;
        feed.title = posting.title;
        feed.writer = posting.writer;
        return feed;
      });
      await FeedService.FeedDAO.save(feeds);
      return result;
    } else {
      return result;
    }
  }
}
4. Send push event
fcm이 알아서 해준다.
5. Show notification to user
fcm서버에서 오는 푸시알림 응답을 받으려면, 항상 돌아가는 서비스 워커가 있어야한다. 이것도 firebase에서 제공하므로 구성을 해주면된다.
https://firebase.google.com/docs/cloud-messaging/js/receive?hl=ko
자바스크립트 클라이언트에서 메시지 수신 | Firebase 클라우드 메시징
Google I/O 2023에서 Firebase의 주요 소식을 확인하세요. 자세히 알아보기 의견 보내기 자바스크립트 클라이언트에서 메시지 수신 컬렉션을 사용해 정리하기 내 환경설정을 기준으로 콘텐츠를 저장
firebase.google.com
얘는 사용자 디바이스에 설치되어야 하므로 public경로에 있어야한다.
// Give the service worker access to Firebase Messaging.
// Note that you can only use Firebase Messaging here. Other Firebase libraries
// are not available in the service worker.
importScripts('https://www.gstatic.com/firebasejs/8.10.1/firebase-app.js');
importScripts(
  'https://www.gstatic.com/firebasejs/8.10.1/firebase-messaging.js'
);

// Initialize the Firebase app in the service worker by passing in
// your app's Firebase config object.
// https://firebase.google.com/docs/web/setup#config-object
firebase.initializeApp({
	...
});

// Retrieve an instance of Firebase Messaging so that it can handle background
// messages.
const messaging = firebase.messaging();

//FCM서버로 부터 받은 데이터를 표기해주는 부분
messaging.onBackgroundMessage((payload) => {
  console.log(
    '[firebase-messaging-sw.js] Received background message ',
    payload
  );
  //받은 payload로 메시지 구성
  const options = {
    body: payload.data.body,
    icon: payload.data.image,
    vibrate: [200, 100, 200],
  };
  //보여주기
  self.registration.showNotification('새로운 글이 작성되었어요!', options);
});결과

해결하지 못한 문제
iphone 에서 아래 코드가 작동하지 않는다.
import { getMessaging, getToken, onMessage } from 'firebase/messaging';
// Import the functions you need from the SDKs you need
export const getFireBaseToken = async () => {
  try {
    const messaging = getMessaging();
    const token = await getToken(messaging, {
      vapidKey: process.env.NEXT_PUBLIC_VAPID_KEY,
    });
    onMessage(messaging, (payload) => {
      console.log('Message recieved. ', payload);
    });
    return token;
  } catch (err: any) {
    throw err;
  }
};getToken에서 Notification 객체가 없다고 나오면서 실행되지 않는다.
알고보니 fcm이 ios safari에서 지원되지 않는다...

변경사항이 있으면 추가해볼 예정이다.
